Começando
Da segurança do Burstcoin à seleção da carteira, o guia Introdução as informações necessárias para ter sucesso.
Programas
A coleção definitiva de software de código aberto e fácil de usar está localizada na Biblioteca de software Burstcoin.
Documentação
Visite o Projeto de documentação do Burstcoin para obter mais informações. Contribua com nova documentação ou recomende melhorias.
Torneiras
Ative uma nova carteira para mineração ou para receber uma transferência do Bittrex. Visite a Burstcoin Community Faucet list.
FAQs
Suportando novos usuários, esta seção contém perguntas freqüentes. Ajude a curadoria visitando a seção de documentação.
Software burstcoin
Burstcoin software é desenvolvido por programadores talentosos que são ativos na Comunidade Burstcoin. Como você pode saber de ler sobre a história de Burstcoin, sua tecnologia blockchain núcleo é impressionante. Com base neste núcleo, as aplicações trazem esses recursos impressionantes para negócios do mundo real e contribuem para a adoção do consumidor no mundo real. A habilidade e a dedicação que o desenvolvimento de Burstcoin atrai e retém é um testamento a seu valor subjacente do núcleo e unicidade.
Um olhar através da biblioteca de software Burstcoin vai deixar você impressionado com o que pode ser realizado por uma comunidade apaixonada que compreende o valor de Burstcoin.
Contribuições para o desenvolvimento são apreciadas. Para se envolver, consulte a seção de desenvolvimento.
Biblioteca de software burstcoin
Uma grande quantidade de conhecimento técnico não é necessária para usar o software de código aberto altamente desenvolvido da rede Burstcoin. Com uma versão de 64 bits do Windows, todo o software necessário para enviar e receber Burstcoin, para operações básicas de mineração, e até mesmo para executar um nó completo pode ser instalado usando o QBundle, um pacote totalmente integrado que requer apenas alguns cliques e um pouco de tempo aguardando componentes individuais para baixar e instalar automaticamente.
Para usuários mais experientes, esta biblioteca contém toda a coleção de software Burstcoin.
Por favor, note: novos usuários devem rever o guia intitulado “introdução ao Burstcoin” antes de instalar ou usar qualquer software Burstcoin.
Esta coleção de software Burstcoin é organizada por categoria. Clique nos sinais de adição para abrir cada seção.
QBundle-pacote de instalação para Windows que inclui a carteira principal BRS, software de nó completo, software de plotagem, software de mineração e outros programas
Estável, local, Dymaxion compatível
A escolha mais fácil para iniciantes usando o Windows é baixar o Qbundle. QBundle é um lançador conveniente que instala a carteira BRS local, software de plotagem, e software de mineração com apenas alguns cliques.
Principais desenvolvedores: Harry1453
Link de download: https://github.com/Burst-apps-Team/Qbundle/releases
Plataforma: Windows
Guia de instalação: instalação do Qbundle e guia do usuário
Software de referência de intermitência (BRS)
Estável, local, Dymaxion compatível
O Burst Reference software (BRS) é a principal carteira Burstcoin. Ele permite a conexão com a rede Burstcoin. O software Burst Reference é a carteira/software incluído no QBundle. Esta versão da carteira é desenvolvida e mantida pelo Burst Alliance e suporta uma infinidade de back-ends de banco de dados.
Desenvolvedor principal: Burst Alliance
Link de download: https://github.com/Burst-apps-Team/burstcoin/releases
Plataforma: Windows, Linux, MacOS, Docker. Veja abaixo as instruções de instalação específicas da plataforma.
BRS/Windows Installation
| Burst Reference Software - Windows Installation |
|---|
| Status - Under Review |
Installation with QBundle
All the details regarding the installation of BRS can be found here: QBundle. Indeed, QBundle is a launcher allowing you to install the Burst local wallet in a few clicks.
Installation of BRS only (with MariaDB)
Firstly, you will have to download the latest version of BRS here (zip) : https://github.com/PoC-Consortium/burstcoin/releases. In the conf directory, copy brs-default.properties into a new file named brs.properties.
Secondly, be sure to have the latest version of Java installed on your computer : https://java.com/de/download/.
You will also have to download and install MariaDB : https://downloads.mariadb.org/.
The MariaDb installation will ask to setup a password for the root user.
Add this password to the brs.propertiescode> file created above in the following section:
DB.Url=jdbc:mariadb://localhost:3306/burstdatabaseDB.Username=rootDB.Password=YOUR_PASSWORD
Setup MariaDB
The MariaDB installation will also install HeidiSQL, a gui tool to administer MariaDb. Use it to connect to the newly created MariaDb server and create a new DB called ‘burstwallet’.
MariaDB knowledge base : https://mariadb.com/kb/en/library/documentation/
HeidiSQL documentation : https://www.heidisql.com/help.php
You can also directly connect to mysql and create database trough console :
mysql -u root -pNow we create the database burstwalletcode> for the blockchain.
CREATE DATABASE burstwallet;In addition, we create a user which is used by the wallet to access the database. Replace <your password>code> with a password of your choice.
CREATE USER 'burstwallet'@'localhost' IDENTIFIED BY '<your password>';Finally we, grant this user all privileges for the database burstwalletcode>.
GRANT ALL PRIVILEGES ON burstwallet.* TO 'burstwallet'@'localhost';Finally, now that the database is created and the brs.propertiescode> configured, you only have to run burst.cmdcode> in the burstcoin folder.
How to run a full node on Windows?
Why Run a Full Node ?
Running a full node is one of the most important ways to help support the Burst network. This allows other peers to connect to your wallet and synchronize the blockchain if they are not using an imported DB. When light clients are released, Full Nodes maintain a copy of the blockchain, in the decentralized manner that crypto currencies are designed to run, while light clients will not. Below are the steps for setting up a full node.
Steps on Windows
Firstly, if you have the latest BRS version, UPnP should be enabled and you already run a full node. Otherwise, following these steps :
- Once you have a local wallet installed and running you need to forward port 8123 to allow other peers to connect to your wallet.
- We now need to get some IP addresses.
- Open “Command Prompt”.
- Type “ipconfig”
- Find and record your “Default Gateway” and “IPv4 Address”
- Now you will set the machine to have a static IP address. This is so that if the machine restarts, it will not change IP addresses and negate the port forwarding rule we will set up later.
- Open “Control Panel”.
- Open “Network and Internet”.
- Open “Network and Charing Center”.
- In the left menu, open “Change Adapter Settings”.
- Right click your preferred method of internet connection.
- Select “Properties”.
- Uncheck “Internet Protocol Version 6 (TCP/IPv6)”.
- Click “Internet Protocol Version 4 (TCP/IPv4)”.
- Open “Properties”
- Select “Use the following IP address”
- In “IP address” type the IPv4 number that you got in Command Prompt.
- In “Subnet Mask” type “255.255.255.0”.
- In “Default Gateway” type the default gateway address you got in Command Prompt.
- Select “Use the following DNS server addresses”
- In “Preferred DNS server” type “8.8.8.8”
- In “Alternate DNS server” type “8.8.4.4”
- Check “Validate settings upon exit”
- Click “OK”
- If you receive a warning about “Multiple default gateways…” select “Yes”.
- Click “Close”
- Now open your network router settings by entering your default gateway IP in the URL field of your browser.
- Login to your router.
- If you have never used these settings before, most ISPs have default username/password combinations. A quick google search will help you find it.
- If you do not remember your username/password combo, you will need to factory reset your router. Be mindful, this will force you to re-setup your entire network.
- Find the “Port Forwarding” option. Note, “Port Forwarding” and “Port Triggering” are NOT the same. “Port Forwarding” is generally under the “Advanced” tab.
- Select “Add Service”, “Add Rule”, or anything along those lines.
- Set “Common Service” as “Other”.
- Set service name to “Burstcoin”.
- Set “Service Type” to “TCP/UDP”.
- Set IPv4 Address to your machines address which is the address you just made static.
- Disregard the IPv6 Address field.
- Set your “Start Port” and “End Port” to “8123”.
- Save the new service.
- Finally, you must reserve the IP address for your specific machine
- Navigate to “Connected Devices” (or something of the like).
- Find and click-on the machine you are running the node from.
- Select “Edit”
- Change configuration to “Reserved IP”
- Verify the IP is the same one you set in port forwarding.
- Select Save.
- You are now finished and can close out network settings.
The local wallet must remain running for your full node to be accessible to the network. After a few hours to a few days the network observer will update and you can check that your set up worked. First find your external IP address and then search your external IP address and port in the network observer (ex. 193.182.13.162:8123).
BRS/MacOS Installation
Installation of MacOS Burst Wallet
This tutorial will walk you through the steps required to run a Burst wallet locally on MacOS.
Quick Start
Note: A simple bash script is available to complete all of the steps for you if you prefer using a script. Simply download a .zip of the code located at https://github.com/beatsbears/macos_burst and follow the directions in the README file. If you prefer to execute each step without using a script, begin the process with the dependencies section.
Dependencies
There are a few dependencies that you should check on prior to starting the install process.
- OSX 10.10 or higher
- Sufficient disk space for the full blockchain (~8Gb or so)
- The ability to leave your computer up and running for several hours in order to allow the full blockchain to synchronize.
Steps
1. Install Homebrew
Homebrew (brew) is an excellent package manager for MacOS. To install, open a new terminal and run the following command. Note: You may be asked for your password in order to complete.
$ /usr/bin/ruby -e "$(curl -fsSL https://raw.githubusercontent.com/Homebrew/install/master/install)"
If you already have brew installed, it is a good practice to make sure everything is up to date by entering
$ brew update
2. Install MariaDB
MariaDB is an open-source fork of the MySQL relational database. It is used to store the blockchain and other wallet information. Install MariaDB by typing the following.
$ brew install mariadb
3. Start MariaDB and create a user for the wallet
$ brew services start mariadb
Once MariaDB is running, log into MariaDB to create a new wallet database and add a user to manage it. Note: Your MariaDB server will likely not have a root password set. Consult google for instructions for setting a new root password.
$ mysql -u root -p -h localhost
Once you have successfully logged into MariaDB, execute the following SQL commands.
CREATE DATABASE burstwallet; CREATE USER 'burstwallet'@'localhost' IDENTIFIED BY '<YOUR PASSWORD>'; GRANT ALL PRIVILEGES ON burstwallet.* TO 'burstwallet'@'localhost';
Assuming these commands have executed successfully, exit the MariaDB console by typing qcode> and hitting Enter.
4. Install Java 8 SDK
Brew gives you the latest version of all packages, but the latest version of Java may not work without issue. You can install the latest verified version (Java 8) by following these steps.
Install brew cask.
$ brew tap caskroom/cask
Use brew cask to install a specific version of a package.
$ brew cask install java8
5. Download and setup the wallet
The wallet package is located at https://github.com/burst-apps-team/burstcoin/releases. Unzip the latest release and open the nxt.properties file from the conf directory in a text editor. Add the following lines to the end of the file
nxt.dbUrl=jdbc:mariadb://localhost:3306/burstwalletnxt.dbUsername=burstwalletnxt.dbPassword=<YOUR PASSWORD>
These values tell Java where to find the MariaDB database.
6. Start the wallet
In your open terminal window verify that you are in the same directory as the burst.sh startup script. If you run ls in your terminal window you should see a response similar to the following:
Slow-Air:burstcoin-1.3.6cg andrewscott$ 1s
Burst_Wallet.url burst.sh html
MIT-license burst_db lib
burst.cmd conf
burst.jar genscoop.c1
In your terminal window, use the following command to make sure you have permission to execute the startup script.
chmod +x burst.sh
Launch the wallet script. Note: You will need to leave this terminal window running until the full blockchain has synchronized. This could take several hours or days depending on your processor speed and and internet connection.
./burst.sh
You should see a lot of output flying by pretty quickly as the wallet starts up.
7. Creating your account and signing in. (marked for research) (URL needed)
Assuming you see no obvious errors while the wallet is starting up, check to see if it is running successfully by entering (similar to) “https://” “localhost:8125/index.htm” in your browser. Your wallet should appear.
Click the New? Create Your Account! Botão. The wallet will generate a passphrase of 12 words. WRITE THESE WORDS DOWN AND DO NOT SHARE THEM. This passphrase is your private key and will be how you access your wallet and Burst funds. Por favor, revise a seção getting started guide para obter informações sobre como proteger seu Burst. Follow the confirmation step on the next page and click Next .
You should now see the wallet dashboard.
If so, congratulations! You are up and running.
8. Wait for the blockchain to download
Now that you have your wallet running locally and have created an account, you will need to wait for the blockchain to fully synchronize before you can see your up-to-date Burst balance. This may take a few hours or a few days depending on your processor and internet connection speed. Please note: Your Account Id is listed in the top left corner of your wallet. This address is necessary for sending and receiving Burst.
9. References
How to run a full node on MacOS?
Why Run a Full Node ?
Running a full node is one of the most important ways to help support the Burst network. This allows other peers to connect to your wallet and synchronize the blockchain if they are not using an imported DB. When light clients are released, Full Nodes maintain a copy of the blockchain, in the decentralized manner that crypto currencies are designed to run, while light clients will not. Below are the steps for setting up a full node.
Network Settings
- Once you have a local wallet installed and running you need to forward port 8123 to allow other peers to connect to your wallet.
- Now you will set the machine to have a static IP address. This is so that if the machine restarts, it will not change IP addresses and negate the port forwarding rule we will set up later.
Steps on MacOS
Firstly, if you have the latest BRS version, UPnP should be enabled and you already run a full node. Otherwise, following these steps :
- Open “System Preferences”
- Select “Network”
- Select “Advanced”
- Select “TCP/IP”
- Note down your “IPv4 Address”
- Note down the “Router” address, this is your default gateway.
- Leave “Configure IPv6” set to “Automatic”.
- Change “Configure IPv4” to “Manual”.
- Now in the “IPv4 Address” field, enter the IPv4 address you copied down before switching to manual.
- Make sure “Subnet Mask” is still 255.255.255.0
- Make sure “Router” still matches the router number you copied down before switching to manual.
- Click “Ok”
- Click “Apply”
- Close “System Preferences”
Router Settings
Now open your network router settings by entering your default gateway IP in the URL field of your browser. Login to your router.
- If you have never used these settings before, most ISPs have default username/password combinations. A quick google search will help you find it.
- If you do not remember your username/password combo, you will need to factory reset your router. Be mindful, this will force you to re-setup your entire network.
- Find the “Port Forwarding” option. Note, “Port Forwarding” and “Port Triggering” are NOT the same. “Port Forwarding” is generally under the “Advanced” tab.
- Select “Add Service”, “Add Rule”, or anything along those lines.
- Set “Common Service” as “Other”.
- Set service name to “Burstcoin”.
- Set “Service Type” to “TCP/UDP”.
- Set IPv4 Address to your machines address which is the address you just made static.
- Disregard the IPv6 Address field.
- Set your “Start Port” and “End Port” to “8123”.>
- Save the new service.
The local wallet must remain running for your full node to be accessible to the network.
Referências:
- https://www.reddit.com/r/burstcoin/comments/7lrdc1/guide_to_getting_the_poc_wallet_running_on_a_mac/
- medium.com/@aclaytonscott/burst-part-2-macos-wallet-setup-tutorial-2822bb029f5
BRS/Linux Installation
Debian 9 “Stretch” installation
The following steps are to install BRS Core Wallet on a fresh installation of Debian Linux version 9 “Stretch”. Please be sure to check Git Repository for the latest release before proceeding.
Note: Commands to be entered into the shell will be formatted in bold text, e.g.:
date
example command outputs will not be bold, e.g.:
Wed 28 Nov 12:02:18 GMT 2018
Prerequisites
Before you begin the installation, the following packages need to be installed:
- java 8 jdk
- curl
- dirmngr
Make sure your installation is up to date
apt update && apt upgrade
Run the following command to install the above packages:
apt install curl default-jdk dirmngr -y
Configuring Java environment path
Find the path to the jdk
update-alternatives --config javac
If only one version of Java is installed, this will give you a similar output to the following:
There is only one alternative in link group javac (providing /usr/bin/javac): /usr/lib/jvm/java-8-openjdk-amd64/bin/javacNothing to configure.
Copy the path from the last output and edit the environment file:
nano /etc/environment
Add the following line to the file:
JAVA_HOME="/usr/lib/jvm/java-8-openjdk-amd64/bin/javac" (taken from the path above)
To make the above change effective in your current shell, run the following:
source /etc/environment
Now test that the JAVA_HOME variable is part of PATH
echo $JAVA_HOME
This will output the path you entered into the environment file. Now confirm the version of java installed
javac -version
Installing MariaDB
Add the MariaDB signing key
apt-key adv --recv-keys --keyserver hkp://keyserver.ubuntu.com:80 0xF1656F24C74CD1D8
Grab the and run MariaDB setup script
curl -sS https://downloads.mariadb.com/MariaDB/mariadb_repo_setup | bash
Update your sources list:
apt update
Install MariaDB:
apt install mariadb-server
During installation you will be prompted to enter a password for the root user. Enter and remember this as we will need it later.
Create a database(brs_master), user (brs_user) and assign a password to the user by running the following command:
echo "CREATE DATABASE brs_master; CREATE USER 'brs_user'@'localhost' IDENTIFIED BY 'yourpassword';GRANT ALL PRIVILEGES ON brs_master.* TO 'brs_user'@'localhost';" | mysql -uroot -pmysql -uroot -p < init-mysql.sql
This will prompt you for the password you entered for the root user when installing mariaDB
Configuring the BRS Wallet
Grab the BRSWallet zip from GitHub (always be sure to check link to the latest version. (2.2.6 was latest at time of writing)
wget https://github.com/PoC-Consortium/burstcoin/releases/download/2.2.6/burstcoin-2.2.6.zip
Create a directory to unzip to:
mkdir BRSWallet
Unzip the burstcoin zip file to the newly created directory:
unzip burstcoin-2.2.6.zip -d BRSWallet/
Navigate to the conf subdirectory within the newly created directory:
cd BRSWallet/conf
Create a brs.properties file inside the conf folder:
nano brs.properties
Add the following lines:
DB.Url=jdbc:mariadb://localhost:3306/brs_masterDB.Username=brs_userDB.Password=yourpassword
O burst.sh file is not yet executable. We need to change the permissions to make it so. Drop back to the BRSWallet directory cd .. and issue the following:
chmod 750 burst.sh
Now when we list the contents of the directory we can see that the burst.sh file has the correct permissions:
ls -l
total 1399340-rw-r--r-- 1 root root 1409751247 Nov 5 12:29 brs.mariadb.zip-rw-r--r-- 1 root root 507 Nov 18 22:17 burst.cmddrwxr-xr-x 2 root root 4096 Nov 18 22:16 burst_db-rw-r--r-- 1 root root 23015701 Nov 18 22:17 burst.jar-rwxr-x--- 1 root root 17831 Nov 18 22:17 burst.sh-rw-r--r-- 1 root root 46 Nov 18 22:17 Burst_Wallet.urldrwxr-xr-x 2 root root 4096 Nov 29 15:44 conf-rw-r--r-- 1 root root 29288 Nov 18 22:17 genscoop.cldrwxr-xr-x 3 root root 4096 Nov 18 22:17 html-rw-r--r-- 1 root root 23232 Nov 18 22:17 init-mysql.sqldrwxr-xr-x 3 root root 4096 Nov 18 22:17 lib-rw-r--r-- 1 root root 35149 Nov 18 22:17 LICENSE.txt-rw-r--r-- 1 root root 4574 Nov 18 22:17 README.md
Importing the database
The quickest way to get up an running is to bootstrap the database by importing a relatively up to date dump of the database. Your wallet will synchronise from this point in time automatically. If you prefer to synchronise from scratch this will take much longer to complete.
./burst.sh import mariadb
If you already have a/part of a brs_master database present, you will be asked if you want to remove the current database, download and import a new one. Answer y or n.
Do you want to remove the current databases, download and import new one? y
If you created the brs.properties file as per above you will be asked the following question:
Detected a previous database config(conf/brs.properties). Do you want to use the config?
Answer: y
Answer the questions when prompted. If you are running the wallet locally on the same device that you have your terminal open to and you used the same database (brs_master) and username (brs_user) above when creating the database, you can simply press enter for the first three questions. For the fourth question, enter the password that you input when creating your database and user.
./burst.sh import mariadbDo you want to remove the current databases, download and import new one? yDetected a previous database config(conf/brs.properties). Do you want to use the config? yCould not find Database PasswordPlease enter your connection detailsHost (localhost) :Database (brs_master):Username (brs_user) :Password empty : <Enter your password here>--2018-11-29 15:44:47-- https://download.cryptoguru.org/burst/wallet/brs.mariadb.zipResolving download.cryptoguru.org (download.cryptoguru.org)... 195.201.117.34Connecting to download.cryptoguru.org (download.cryptoguru.org)|195.201.117.34|:443... connected.HTTP request sent, awaiting response... 200 OKLength: 1409751247 (1.3G) [application/zip]Saving to: ‘brs.mariadb.zip’brs.mariadb.zip 100%[====================================================>] 1.31G 1.87MB/s in 12m 4s2018-11-29 15:56:52 (1.86 MB/s) - ‘brs.mariadb.zip’ saved [1409751247/1409751247]Archive: brs.mariadb.zip inflating: brs.mariadb.sql[+] Import successful - please remove brs.mariadb.zip
Remove the download DB dump zip file to reclaim space and avoid an outdated zip file in future if you require a DB bootstrap
rm brs.mariadb.zip
Running the Wallet
We need to change owner from root to a normal user as all the files/directories are now owned by root (see below)
total 1399340-rw-r--r-- 1 root root 1409751247 Nov 5 12:29 brs.mariadb.zip-rw-r--r-- 1 root root 507 Nov 18 22:17 burst.cmddrwxr-xr-x 2 root root 4096 Nov 18 22:16 burst_db-rw-r--r-- 1 root root 23015701 Nov 18 22:17 burst.jar-rwxr-x--- 1 root root 17831 Nov 18 22:17 burst.sh-rw-r--r-- 1 root root 46 Nov 18 22:17 Burst_Wallet.urldrwxr-xr-x 2 root root 4096 Nov 29 15:44 conf-rw-r--r-- 1 root root 29288 Nov 18 22:17 genscoop.cldrwxr-xr-x 3 root root 4096 Nov 18 22:17 html-rw-r--r-- 1 root root 23232 Nov 18 22:17 init-mysql.sqldrwxr-xr-x 3 root root 4096 Nov 18 22:17 lib-rw-r--r-- 1 root root 35149 Nov 18 22:17 LICENSE.txt-rw-r--r-- 1 root root 4574 Nov 18 22:17 README.md
Navigate to the BRSWallet parent directory
cd ..
Change ownership of all files and directores within the BRSWallet directory:
chown -R burst:burst BRSWallet/
Now the ownership has ben changed to the user burst:
total 1399344-rw-r--r-- 1 burst burst 2506 Nov 29 16:59 brs.log-rw-r--r-- 1 burst burst 1409751247 Nov 5 12:29 brs.mariadb.zip-rw-r--r-- 1 burst burst 507 Nov 18 22:17 burst.cmddrwxr-xr-x 2 burst burst 4096 Nov 18 22:16 burst_db-rw-r--r-- 1 burst burst 23015701 Nov 18 22:17 burst.jar-rwxr-x--- 1 burst burst 17831 Nov 18 22:17 burst.sh-rw-r--r-- 1 burst burst 46 Nov 18 22:17 Burst_Wallet.urldrwxr-xr-x 2 burst burst 4096 Nov 30 10:39 conf-rw-r--r-- 1 burst burst 29288 Nov 18 22:17 genscoop.cldrwxr-xr-x 3 burst burst 4096 Nov 18 22:17 html-rw-r--r-- 1 burst burst 23232 Nov 18 22:17 init-mysql.sqldrwxr-xr-x 3 burst burst 4096 Nov 18 22:17 lib-rw-r--r-- 1 burst burst 35149 Nov 18 22:17 LICENSE.txt-rw-r--r-- 1 burst burst 4574 Nov 18 22:17 README.md
At this stage you can reboot the machine to ensure that the environmental variables are applied to every user session going forward. Following the reboot, log in as the your normal user (burst in this case) and run the wallet:
./burst.sh
You will see the following output:
Nov 29, 2018 4:28:33 PM brs.Burst loadPropertiesINFO: Initializing Burst Reference Software (BRS) version 2.2.6Nov 29, 2018 4:28:33 PM org.ehcache.core.EhcacheManager createCacheINFO: Cache 'account' created in EhcacheManager.[INFO] 2018-11-29 16:28:33 brs.db.sql.Db - Using mariadb Backend[INFO] 2018-11-29 16:28:33 brs.db.mariadb.MariadbDbVersion - Database update may take a while if needed, current db version 177...
Note: If closing the terminal or pressing Ctrl-c, the wallet will shutdown:
[INFO] 2018-11-29 16:53:12 brs.Burst - Shutting down...
Configure BRS to run as a service/daemon
Closing the terminal or pressing Ctrl-c will result to a shutdown of the wallet. To avoid this, BRS should be run as a service. It is particularly helpful if you run BRS on a linux system using SSH.
First, if systemd isn’t installed on your system, run the following command:
sudo apt install systemd
Then, you will have to create a new service file for BRS:
sudo nano /etc/systemd/system/brs.service
Add the following configuration (replace description, Exec, WorkingDirectory and User according to your setup):
[Unit]Description=BRS WalletAfter=network.targetWants=network.target[Service]ExecStart=/usr/bin/java -cp /home/burst/burst.jar:/home/burst/conf brs.BurstWorkingDirectory=/home/burst/User=brs-mariadbRestart=alwaysRestartSec=90[Install]WantedBy=multi-user.target
After that, enable the service:
sudo systemctl enable brs.service
To start the service, type:
systemctl start brs.service
To get the status of the service:
systemctl status brs.service
BRS/Docker Installation
Burst Reference Software – Docker Installation
Docker Installation
The Burst Reference Software can be run with Docker and Docker-Compose. Since Docker supports all major platforms, this can be an easy-to-setup alternative to a platform-dependent installation of the Burst Reference Software.
Prerequisites
Database
Currently, Docker images for BRS version 2.2 with MariaDB or H2 Database are available at Docker Hub. You have to choose one of them, which is used to store the blockchain.
MariaDB
The following docker-compose.ymlcode> file can be used to run the BRS with MariaDB database in containers.
version: '3'<!--T:29-->services: burstcoin: image: pocconsortium/burstcoin:2.2-mariadb restart: always depends_on: - mariadb ports: - 8123:8123 - 8125:8125 mariadb: image: mariadb:10 environment: - MYSQL_ROOT_PASSWORD=burst - MYSQL_DATABASE=burst command: mysqld --character_set_server=utf8mb4 volumes: - ./burst_db:/var/lib/mysql
Save the file and run it.
docker-compose up -d
With the -dcode> flag, both containers are started as background processes. A burst_dbcode> folder will be created in the directory of the docker-compose.ymlcode> file, if it was not created before. This folder is mounted to the MariaDB storage and holds the burstcode> database containing the blockchain. The containers can be stopped and removed at any time via docker-compose downcode>. With the next start, the burst_dbcode> folder will be mounted again and your previous blockchain status will be loaded.
Alternatively, H2 can be used as database to store the blockchain. H2 is an embedded database, therefore one does not have to run it in a separate container. Simply run the following command.
docker run -p 8123:8123 -p 8125:8125 -v "$(pwd)"/burst_db:/etc/burstcoin/burst_db -d pocconsortium/burstcoin:2.2-h2
"$(pwd)"/burst_db is the path to the folder which is mounted to the H2 storage. If it does not exist a new burst_dbcode> folder is created in the current directory.
Custom configuration
In order to use a custom config – brs.propertiescode> file, you can simply mount a folder containing the brs-default.propertiescode> and the brs.propertiescode> to the /confcode> mount point.
MariaDB
version: '3'<!--T:33-->services: burstcoin: image: pocconsortium/burstcoin:2.2-mariadb restart: always depends_on: - mariadb ports: - 8123:8123 - 8125:8125 volumes: - ./conf:/etc/burstcoin/conf mariadb: image: mariadb:10 environment: - MYSQL_ROOT_PASSWORD=burst - MYSQL_DATABASE=burst command: mysqld --character_set_server=utf8mb4 volumes: - ./burst_db:/var/lib/mysql
docker run -p 8123:8123 -p 8125:8125 -v "$(pwd)"/burst_db:/etc/burstcoin/burst_db -v "$(pwd)"/conf:/etc/burstcoin/conf -d pocconsortium/burstcoin:2.2-h2
Phoenix
Local, Dymaxion compatível
Nova carteira de estouro de plataforma cruzada. Uma arquitetura de aplicativos multi-plataforma é possível através de algumas tecnologias principais de front-end: React Native, angular e Electron. Ao usar essas tecnologias em conjunto, os desenvolvedores da carteira Burst desfrutarão de um fluxo de trabalho de desenvolvimento de aplicativos moderno sem sacrificar a qualidade do produto final. Consulte SIP-18 para obter mais informações.
Desenvolvedor principal: Burst apps Team (BAT)
Repositório github: https://github.com/burst-apps-team/phoenix/releases
Plataforma: Windows, MacOS, Linux, iOS, Android
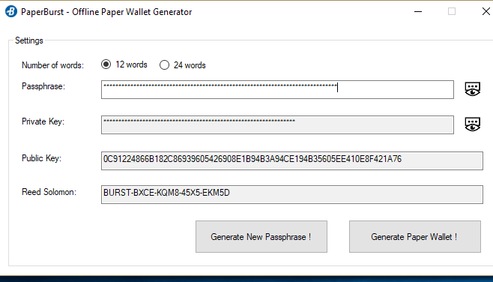
O PaperBurst
Estável, Dymaxion compatível
PaperBurst é um gerador de carteira de papel para Burst.
Desenvolvedor principal: Umbrellacorp03
Link de download: https://github.com/umbrellacorp03/PaperBurst/releases/tag/1.0
Plataforma: Windows
Guide:
This tool can be used to generate a new wallet or to use an existing wallet. In order to use the tool, provide information as shown:
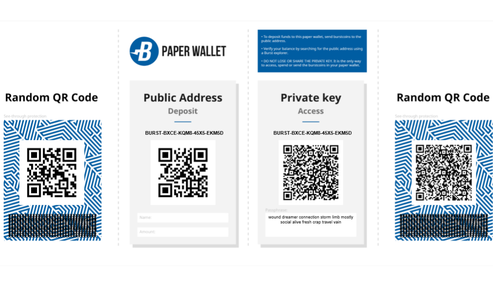
After all required fields of the form have been populated, clicking the desired button. The paper wallet is output as an easily printable .pdf file.
Paper wallets can be used to transfer funds using public keys, to store funds (the funds are still on the blockchain rather than on the paper). Paperburst can be used as a reference document for cold storage.
Easy2Burst
Dymaxion compatível
Easy2Burst é o sucessor do QBundle.
Desenvolvedor principal: HeosSacer
Repositório github: https://github.com/HeosSacer/Easy2Burst
Plataforma: Windows, Linux, MacOS
Aspera
Dymaxion compatível
Aspera era uma carteira Burstcoin escrito em ir. Esta carteira abre toda uma nova dimensão para Burstcoin com tecnologias de ponta (validação de blocos parciais, novo front-end, etc.). Este projeto não está mais sendo desenvolvido.
Desenvolvedor principal: PoC-Consortium
Repositório github: https://github.com/POC-Consortium/aspera
Plataforma: Windows, Linux, MacOS
Carteira móvel Burstpay (nova!)
Estável, Dymaxion compatível
Carteira móvel para Android e iOS, que oferece os seguintes recursos:
- Ver apenas endereços
- Conversão de moeda
- Criptografia e descriptografia do lado do cliente
- Mensagens de transação criptografadas/não criptografadas
- Livro de contato
- Suporte a QR Code
- Geração de senha segura e fácil
- Suporte para mais de 15 idiomas
- Suporte para mais de 30 moedas
Desenvolvedor Principal: iHashing Technology Co., Ltd.
Link para Download: https://github.com/ihashing/BURSTPAY-mobile
Plataforma: iOS, Android
Carteira móvel burstcoin
Existem várias aplicações móveis no Google Play para Burst, mas alguns estão desatualizados e alguns de qualidade duvidosa. Esta é a única carteira móvel que é recomendado.
Estável, online, Dymaxion compatível
A carteira móvel para Android e iOS, que fornece as seguintes características:
- Ver apenas endereços
- Conversão de moeda
- Criptografia e descriptografia do lado do cliente
- Mensagens de transação criptografadas/não criptografadas
- Livro de contato
- Suporte a QR Code
- Geração de senha segura e fácil
- Suporte para mais de 15 idiomas
- Suporte para mais de 30 moedas
Desenvolvedor principal: PoC-Consortium (Lead dev: @cgb)
Link de download: https://Play.google.com/Store/apps/Developer?ID=POC+Consortium
Plataforma: Android
O HotWallet
uma versão de peso leve da carteira BURST atual para fácil acesso para enviar e receber BURST.
Main Developer: Zoh, Burst Applications Team
Link de download: hotwallet. Cash
Guia de vídeo: https://www.youtube.com/watch?v=V-1TC3NcMME&feature=youtu.be
I18N – internacionalização (carteira móvel)
A maior parte da localização da carteira é feita por meio de um arquivo. JSON contendo definições para cadeias de caracteres de texto usadas na carteira. A nomeação é tal, que um código de 2 letras denota o idioma. en. JSON é o arquivo de origem (veja abaixo).
Se você quiser traduzir este arquivo em algum idioma, você precisa traduzir o “criar nova conta”, “feito”, etc, não aqueles em ALLCAPS. Uma restrição importante é que o texto traduzido não só seja correto e estilístico, mas também de aproximadamente o mesmo comprimento que o conteúdo original. Pode ser mais curto, mas não muito mais. O código de idioma de 2 letras é ISO 639-1
arquivo de localização en. JSON
Referências
Gravador
Estável, compatível com Dymaxion, POC 1, POC 2
Engraver é um plotter BURST que gera nativamente arquivos de plotagem otimizados.
Ele gera arquivos PoC2 e destina-se a trabalhar em qualquer sistema UNIX com um FileSystem suficientemente sà (capaz de pré-alocar espaço), mas por agora apenas Linux e MacOS foram testados. 64bit apenas!
Desenvolvedor principal: PoC-Consortium
Link de download: https://github.com/POC-Consortium/engraver
Guia de instalação: (veja abaixo) engraver-como compilar a partir de fonte
Engraver- How to compile from source
Credits: Sphinxicus
Description
Engraver is the reference Burstcoin (or Burst) cross-platform plotting software created to further improve and optimize Burst plot file creation.
The following steps are to install Engraver 2.2.0 by compiling from source on a fresh installation of Debian Linux version 9 “Stretch”. Please be sure to check Git Repository for the latest release before proceeding.
Note: Commands to be entered into the shell will be formatted in bold text, e.g.:
date
example command outputs will not be bold, e.g.:
Wed 28 Nov 12:02:18 GMT 2018
Prerequisites
Before you begin the installation, the following packages need to be installed:
- curl
- git
- build-essential
Change to root user:
su
Enter root password
Install curl, git and build essential packages:
apt install curl git build-essential -y
Once the above packages have completed installation, its time to install Rust.
Installing Rust (stable)
To install Rust, run the following command:
curl https://sh.rustup.rs -sSf | sh
You will be presented with three options (see below):
Current installation options: default host triple: x86_64-unknown-linux-gnu default toolchain: stable modify PATH variable: yes1) Proceed with installation (default)2) Customize installation3) Cancel installation>
Escolher option 1 para instalar.
Once installation is complete, follow the instructions to configure your current terminal sessions’ environment variable so that you can run Rust related commands:
source $HOME/.cargo/env
To confirm the installation of the correct channel of Rust, type the following:
rustc -version
This should give you the output below:
rustc 1.31.0 (abe02cefd 2018-12-04)
Obtaining the source files
To download the source files from the Git repository, run the following command, (please make sure to check the exact path to the latest version) :
git clone https://github.com/PoC-Consortium/engraver
This will download and extract the files to the engraver sub directory (from where your present working directory is)
Compiling the source files
Navigate to the engraver directory:
cd engraver
build the application:
cargo build -release
Running Engraver
Once the above has completed, navigate to the executable:
cd /target/release
From here you can run engraver and begin plotting. Example command:
./engraver -n 1000 -id 12345678912345678912 -path /home/burst/Burst -sn 0
To understand the complete range of flags/options available for the engraver application, please read the Wiki page on GitHub.
TurboPlotter 9000
Estável, compatível com Dymaxion, POC 1, POC 2
TurboPlotter 9000 é uma CPU/GPU PoC 1 + PoC 2 plotter e verificador de integridade de plotagem.
Desenvolvedor principal: Blackpawn
Link de download: https://blackpawn.com/TP/
Plataforma: Windows, Linux, MacOS
Método XPlotterGui
Estável, compatível com Dymaxion, POC 1POC 2
XplotterGui é uma versão GUI do Xplotter com cache SSD, mesclagem de arquivos e recursos de conversão do POC2.
Desenvolvedor principal: JohnnyFFM
Link de download: https://github.com/JohnnyFFM/XPlotterGui/releases/Latest
Plataforma: Windows
XPlotter modded
Estável, compatível com Dymaxion, POC 1, POC 2
XPlotter é a plotadora padrão que vem com QBundle e fornece CPU PoC 1 plotagem com suporte AVX. Esta versão modificada suporta a plotagem de PoC 2.
Desenvolvedor principal: JohnnyFFM
Link de download: https://github.com/JohnnyFFM/XPlotter/releases/tag/v.1.31
Plataforma: Windows
Guide:
Plotting is the process of pre-computing hash functions and saving them onto storage units (HDDs). XPlotter is included with QBundle and no additional installation is required. There are however options that need to be configured.
- Click on Tools: Plotting: Plotter
- Add any plotfiles that you already have. Use the “Import Plotfile” button.
- Provide the following information in “Basic settings” before starting the plotter:
Location for saving plot files
Numeric account ID to be associated with the generated plots. Click the selector to the right of the form field to select from a list of accounts. If you enter the ID number manually, be absolutely sure that it is entered correctly. If not, your plot files will be unusable. Be sure that no trailing spaces are included, particularly if you use a copy and paste function to enter the ID.
- Set plot file size using the slider. For easier maintenance, limit plot size to 1 or 2 Terra bytes.
Adding files to “My Plotfiles” and clicking on “Start plotting” will allow the miner to begin using the plots as soon as a scoop has been plotted, it is not necessary to wait until the entire plot file is complete.
Advanced settings for Xplotter allow the user to:
- Set the start nonce of the new plot file. If all existing plots have been imported (recommended) the plotter will continue plotting using the number after the highest existing nonce. Leaving gaps between nonces does not improve mining. If no plot file has been created, the plotter will start with a nonce number of 0.
- Set the number of CPU threads to be used.
- Set the amount of memory to be used.
- For Plot type, use PoC2 (mandatory). Do not use POC1 as it is no longer supported.
- After all settings have been submitted, click “Start Plotting”.
método gpuPlotGenerator
Estável, compatível com Dymaxion, POC 1
gpuPlotGenerator é uma plotter de GPU PoC 1.
Desenvolvedor principal: bhamon
Link de download: https://github.com/bhamon/gpuPlotGenerator/releases/tag/v4.2.2
Plataforma: Windows, Linux, MacOS
Software de mineração:
Scavenger
Estável, compatível com Dymaxion, POC 1
Scavenger é um mineiro estourado escrito em Rust. Caracteriza Io direto, avx512f, avx2, AVX, SSE, e OpenCL.
Desenvolvedor principal: PoC Consortium
Link de download: https://github.com/POC-Consortium/scavenger/releases/tag/v.1.7.2
Plataforma: Windows, MacOS, Linux, UNIX (64 bits)
Scavenger - Compile From Source
Description
Scavenger is a burst miner developped by the PoC Consortiun and written in Rust. If features direct io, avx 512f, avx2, avx, sse and opencl support. At the time of writing this is the preferred miner of choice for both CPU and GPU mining.
The following steps are to install Scavenger 1.6.4 by compiling from source on a fresh installation of Debian Linux version 9 “Stretch”. Please be sure to check Git Repository for the latest release before proceeding.
Note: Commands to be entered into the shell will be formatted in bold text, e.g.:
date
example command outputs will not be bold, e.g.:
Wed 28 Nov 12:02:18 GMT 2018
Prerequisites
Before you begin the installation, the following packages need to be installed:
- curl
- git
- build-essential
Change to root user:
su
Enter root password
Install curl, git and build essential packages:
apt install curl git build-essential -y
Once the above packages have completed installation, its time to install Rust.
Note: The features used when compiling Scavenger are not available on the stable release channel of rust, therefore the nightly channel needs to be installed.
Installing Rust (nightly)
To install Rust, run the following command:
curl https://sh.rustup.rs -sSf | sh
You will be presented with three options (see below):
Current installation options: default host triple: x86_64-unknown-linux-gnu default toolchain: stable modify PATH variable: yes1) Proceed with installation (default)2) Customize installation3) Cancel installation>
To install the nightly channel chose option 2, this will ask you additional questions, answer as per below:
Q: Default host triple?A: Press enter to leave unchanged
Q: Default toolchain? (stable/beta/nightly/none)A: nightly
Q: Modify PATH variable? (y/n)A: y
You will be presented with a summary of the current installation options as per your answers provided above:
Current installation options: default host triple: x86_64-unknown-linux-gnu default toolchain: nightly modify PATH variable: yes1) Proceed with installation (default)2) Customize installation3) Cancel installation
Chose option 1 to install
Once installation is complete, follow the instructions to configure your current terminal sessions’ environment variable so that you can run Rust related commands:
source $HOME/.cargo/env
Switching from Rust (stable) to Rust (nightly)
If you chose to or already have the stable channel of rust installed you can switch channels by using the following command:
rustup default nightly
To confirm the instalation of the correct channel of Rust, type the following:
rustc -version
This should give you the output below, note the “nightly” present (version correct at time of writing):
rustc 1.32.0-nightly (6bfb46e4a 2018-11-26)
Obtaining the source files
To download the source files from the Git repository, run the following command, (please make sure to check the exact path to the latest version as this will change as later versions are released) :
wget https://github.com/PoC-Consortium/scavenger/archive/1.6.4.zip
This will download the file 1.6.4.zip to your current directory.
Extract the contents of the zip file:
unzip 1.6.4.zip
This will create a new directory named scavenger-1.6.4.
Compiling the source files
Navigate to the scavenger-1.6.4 directory
cd scavenger-1.6.4
At this point it is worth deciding what you are going to use to do the mining, CPU/GPU and also what instruction sets are available on your device. See the README.md file located in the scavenger-1.6.4 directory for an overview of features to use.
In this example, a CPU with the SSE2 instruction set will be used therefore the simd feature option is required (the same would work for AVX, AVX2 etc). Run the following command to compile the code:
cargo build -release -features=simd
Post compiling steps
Copy the scavenger executable to the scavenger-1.6.4 directory (two levels up in this case). This placed it in the same directory as the config.yaml file which is required for it to run.
cp scavenger ../../scavenger
Navigate back to your scavenger-1.6.4 directory from the release directory
cd ../..
At this point you can run scavenger and it will make use of the test_data file to simulate mining on the dev.burst-test.net
Once you know it will run you will need to configure the config.yaml file to your setup. The config file itself is well commented and the GitHub Wiki has further information if required.
Additional notes
If the above steps were followed verbatim, all the scavenger files will be owned by root. It is not recommended to run as root so we will change the owner to a normal user, “burst” in this case. From the directory a level up from your scavenger-1.6.4 directory run:
chown -R burst:burst scavenger-1.6.4
This will recursively change ownership to the user “burst” for all files and subdirectories within the scavenger-1.6.4 directory.
to logout of root type:
exit
You are now back at the shell as your normal user (burst). You can now run scavenger by issuing the following command from the scavenger-1.6.4 directory:
./scavenger
Example output from running scavenger
Links
Programas
https://github.com/PoC-Consortium/scavenger/releases/tag/v.1.7.2
GitHub Documentation
Blagominer modded
Estável, compatível com Dymaxion, POC 1, POC 2
Esta é uma versão modificada do Blagominer. Esta modificação de Blagominer constrói em cima das modificações feitas previamente por quibus.
Desenvolvedor principal: JohnnyFFM
Link de download: https://github.com/JohnnyFFM/Miner-Burst/releases/tag/v.1.170911
Plataforma: Windows
Blagominer
- atualização com a mineração dupla livre de colisão
- Rastreamento (e exibição) de arquivos de plotagem possivelmente corrompidos
Estável, compatível com Dymaxion, POC 1, POC 2
Esta é uma versão modificada do Blagominer por adnzno1
Desenvolvedor principal: andzno1
Link de download: https://github.com/andzno1/blagominer
Guide:
Blago’s miner (modified by Quibus and JohnnyFFM) is the default mining software packaged with QBundle. It can be used for pool mining or for solo mining.
Please note: If solo mining, running a fully synchronized local wallet is required. The passphrase for the mining account associated with your plot files must be provided and will be stored in plain text in QBundle/BlagoMiner/miner.conf. If desired, you can create an account specifically for mining rather than using a single wallet for both mining and maintaining significant balances.
- To install, click on “File” and then “Application Manager”.
- Place a check mark in the box next to “Blago’s Miner”.
- Click on “Install/Update”
- After the software downloads and extracts, verify that an extracted (unzipped) folder with the name “BlagoMiner” is located in the main QBundle folder. If the file does not appear, locate it a sub folder of the zipped version and copy it into the main folder (same level as zipped version) as the final installation step.
- Open the miner by clicking “Tools” and the “Miner”. The following screen will appear.
All settings provided in the interface shown above will be passed to the miner.conf file. This file is located in the Qbundle/BlagoMiner folder. Users can edit this file directly.
- If you will be solo mining, click on the “solo mining” radio button.
- If you will be pool mining, click on “Select predefined pool”. Required configuration data will be populated automatically. If your desired pool is not listed, obtain the configuration information directly from the pool operator and enter it manually (mining server, update server, info server, deadline limit, and port information).
- Set the deadline limit. Calculators for this purpose are provided by each pool. If your calculated deadline (based on your available plot size) exceeds your pool’s maximum deadline, this limit should be reduced to the maximum accepted by the pool.
Optional setup:
“Use HDD wakeup” – a script will run which prevents your hard drives from entering sleep mode. “Show winner information” – the account which forges each block will be displayed in the miner console. The info server does not support HTTPS so the address of the local wallet (localhost or 127.0.0.1) and port number 8125 should be provided. “Use multithreading” – Multithreading may improve usage of CPU resources when calculating deadlines.
- Add your plotfile paths to “My Plotfiles” by clicking on “Import Plotfiles” and locating each plotfile or folder containing plotfiles. The miner will use all plot files that are found in configured folders. It is best if the folders used only contain individual plot files. Plotfiles that are removed using the “Remove Plotfiles” button are not
deleted from storage, only their path in the list of plot files is removed. - To start the miner, click on the “Start mining” button.
When the miner is running, pool and plot file information is displayed in the mining console. The miner receives mining information (block height, base target, etc.) and reads through the configured plot files to locate deadlines. Deadlines found are sent to the pool if they are less than or equal to the configured deadline limit. The miner displays “Confirmed DL” if the deadline is accepted by the pool. After all plot files have been read, the miner displays the amount of time taken to read the plot files.
The miner logs are stored in QBundle/BlagoMiner/Logs. These are useful for debugging purposes. The best deadline found for each block is stored in QBundle/BlagoMiner/stat.csv.
When the miner is running, the console window will appears as follows:
Burstcoin-jminer
Estável, compatível com Dymaxion, POC 1, POC 2
Burstcoin-jminer é uma GPU assistida prova de capacidade (PoC) mineiro para Burst.
Desenvolvedor principal: de-luxe
Link de download: https://github.com/de-luxe/burstcoin-jminer/releases/tag/0.5.2-Release
Plataforma: Windows, Linux, MacOS
O CreepMiner
Estável, compatível com Dymaxion, POC 1, POC 2
CreepMiner é um aplicativo cliente para mineração Burst em uma piscina ou solo. Ele suporta mineração de CPU (SSE2/SSE4/AVX/AVX2) ou mineração de GPU (OpenCL, CÔDA).
Desenvolvedor principal: Creepsky
Link de download: https://github.com/Creepsky/creepMiner/releases/tag/1.7.19
Plataforma: Windows, MacOS, linux x86_64 ou ARM7
BurstNeon Burst-pool
Estável, compatível com Dymaxion, POC 2
Este software da associação foi desenvolvido por BurstNeon (https://burstneon.com).
Desenvolvedor principal: BurstNeon
Link de download: https://github.com/BurstNeon/Burst-pool/releases
Plataforma: Linux
Belegost Nogrod
Estável, compatível com Dymaxion, POC 2
Nogrod é o novo software de pool PoCC escrito em GO. Ele fornece suporte SSE4 + AVX2, um sistema de compartilhamento justo com base na capacidade estimada, grpc API, várias carteiras como back-ends usando a API da carteira, pode falar diretamente para banco de dados carteira, e limiares de pagamento dinâmico/intervalos com base em mensagens no blockchain.
Desenvolvedor principal: PoC-Consortium
Link de download: https://github.com/POC-Consortium/Nogrod
Plataforma: Linux
CloudBurst
Estável, Dymaxion compatível
CloudBurst é um aplicativo de armazenamento em nuvem descentralizada para carregar & baixar arquivos do blockchain Burst.
Desenvolvedor principal: CurbShifter
Link de download: https://github.com/CurbShifter/CloudBurstDAPP/releases/Latest
Plataforma: Windows, MacOS
O BurstCoupon
Estável, Dymaxion compatível
BurstCoupon permite que você crie e reivindique cupons protegidos por senha como extensão para o blockchain Burst.
Desenvolvedor principal: CurbShifter
Link de download: https://github.com/CurbShifter/BurstCoupon/releases/tag/1.19
Plataforma: Windows, MacOS
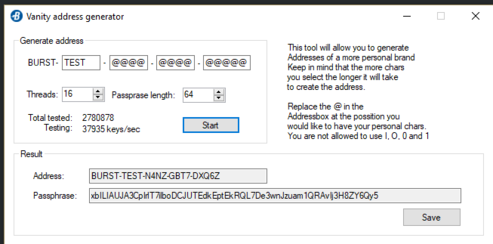
Vanity Address Generator - Included with QBundle
The vanity address generator is a tool for creating vanity or branded Burst account addresses. All address must have “BURST” for the first five leading characters. The capital letter “i” (I), the capital letter “o” (O), zero (0), and the number one (1) are not permitted. To generate a vanity address, enter characters into the form provided. Set the resources that should be used (number of CPU threads) and desired length of the passphrase.
The algorithm which seeks for the account with the desired string is a brute force algorithm, which checks every Burst account and passphrase combination sequentially. The time it takes to find a particular string increases significantly with every additional character. A string of 5 characters at the end takes approximately 4 minutes (more or less depending on computer resources). Each additional character increases the time required exponentially. A string of 8 would take approximately one hour. Longer strings could take weeks.
Poc1to2Converter
Estável, POC 1, POC 2
Poc1to2Converter converte plotagens PoC1 em parcelas POC2.
Desenvolvedor principal: JohnnyFFM
Link de download: https://github.com/JohnnyFFM/Poc1to2Converter/releases/tag/tag/v.2.4
Plataforma: Windows
Conversores PoC-Consortium Poc1to2
Estável, POC 1, POC 2
Este conversor Poc1to2 para Linux converte PoC1 parcelas para POC2 parcelas. Há um conversor binário de ferrugem (recomendado) ou uma versão de script Perl.
Desenvolvedor principal: PoC-Consortium
Link de download: https://github.com/POC-Consortium/Utilities
Plataforma: Linux
Explorador de burstcoin
Estável, Dymaxion compatível
Burstcoin Explorer é um explorador de blocos para a rede Burst.
As características incluem:
- Pesquisar e exibir blocos, contas e transações
- Mantenha uma lista de contas que você está assistindo
- Fique de olho no preço Burst atual, tanto em BTC e USD
- Observe o status atual da rede Burst
- Countdown próximos eventos, como o pré-Dymaxion Hard Fork
Desenvolvedor principal: harry1453
Link de download: https://github.com/harry1453/burstcoin-Explorer-Android/releases/tag/v1.4
Burst MemPool monitor
Estável
Explore transações não confirmadas na blockchain Burstcoin.
Desenvolvedor principal: Mrpilotman
Link para Download: https://github.com/MrPilotMan/Burst-MemPool-Monitor
Plataforma:
BurstLib
BurstLib
Estável, Dymaxion compatível
BurstLib é uma biblioteca dinâmica de plataforma cruzada para tornar mais fácil o desenvolvimento de aplicativos e ferramentas compatíveis com o blockchain Burst.
Desenvolvedor principal: Curbshifter
Link de download: https://github.com/CurbShifter/BurstLib/releases/tag/R16
Plataforma: Windows, MacOS, Linux, UNIX
@burstjs
Uma biblioteca JavaScript BURST para tornar mais fácil para os desenvolvedores criar aplicativos usando angular/React/node. js/JavaScript. A biblioteca é dividida em quatro pacotes:
- @burstjs/core
- @burstjs/crypto
- @burstjs/http
- @burstjs/util.
Desenvolvedor principal: blankey1337 (BAT) e Ohager (BAT)
Documentação: https://burst-apps-team.github.io/phoenix/index.html
Código fonte: https://github.com/Burst-apps-Team/Phoenix/Tree/develop/lib
No NPM: https://www.npmjs.com/search?q=burstjs
Plataforma: Cross Platform